How to Read Band Codes
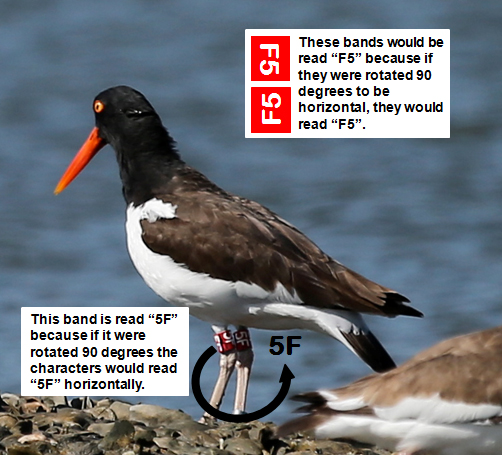
Reading codes on field readable bands can be a fun challenge. To successfully read a code you must record the orientation of the code as well as read the characters. Nearly all oystercatchers with field readable bands have the same code on both bands. Although there are exceptions, in most cases, if you can read the two- or three-character letter/number code and identify the band color, we will be able to positively identify the individual oystercatcher.
Code Orientation
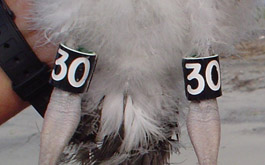
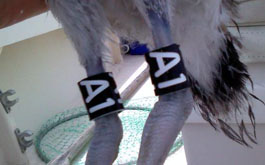
Code orientation refers to the orientation of the entire code, not the individual letters. Band codes may be oriented horizontally (band 30) or vertically (band A1).
In some cases vertical bands were applied “upside down,” but the correct orientation and character order can still be determined.
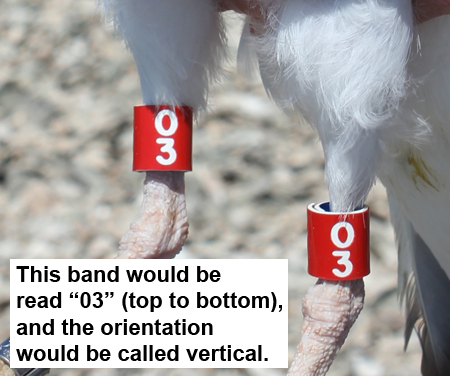
There is another type of vertical code in which the characters are upright, as in the photo of “03” below. Though the individual characters are oriented horizontally, because together they are read vertically, top to bottom, the code’s orientation is vertical.
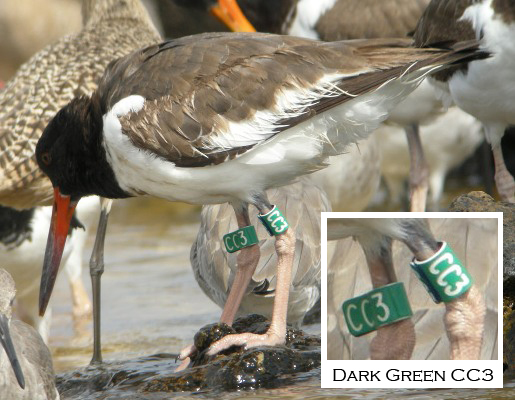
Some birds may have a horizontal code on a flag on one leg and a vertical code on a band on the other leg, as in the photo of dark green “CC3″ below. The orientation of these bands should be reported as “both” since one band is read vertically and one is read horizontally.
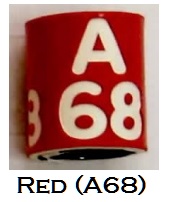
In 2013, a new type of band began to be used. It incorporates three characters arranged in a triangular configuration. The code orientation for this type of band orientation should be reported as “triangle.” Going forward, these “triangle codes” will be the most commonly seen bands, but all types will continue to be possible for many years, as oystercatchers are long-lived birds.
Code Order
Oystercatcher codes are two- or three-characters long, and can be letters, numbers, or a combination of both. The codes are engraved around the bands, repeating two or three times (twice for horizontal codes, three times for vertical and triangle codes). This allows the code to be seen from any angle, but can lead to confusion over which character comes first when reading horizontally oriented codes or triangle configuration codes. Therefore, it is important to determine the order of the characters in the code so as not to confuse LA with AL or A68 with A86.
Two-character codes on bands, and three-character codes on flags, are read left to right. Three-character triangle codes are read top to bottom then left to right. You can always tell which is second in a triangle code by looking to see which of the bottom two characters is on the left side of the top character. Therefore, in the photo above of the triangle-coded band, the correct reading of the code is “A68”. The code in this photo is “CFU.”
Most horizontal codes use an underline or a dot to indicate which order the characters should be read in. An underline indicates that the underlined letter or number is the first character, as in dark green JP in the photo.
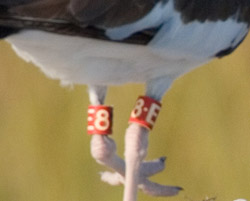
Other codes use a dot. Just read starting from right of the dot. So, in the photo here, the dot separates the replicated engraved codes and shows that the E is the first element of the code, even though characters in the band on the right leg appear in the order “8E”. Note also that it is not possible to tell if the character on the right leg’s band is an E or a B, but taken with the left band, it can be determined to be an E.
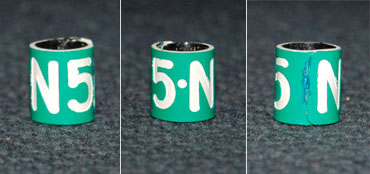
When there is no dot or underline, observers must look for the seam of the band to separate the replicated characters and read from right of the seam. The photos here show a green band inscribed with the code “N5”. The photo on the left shows the code visible in the correct order. The photo in the center shows the band turned so the code appears backward as “5N”. The dot in the center separates the characters and shows that the N is the first element of the code. You can also see that the seam separates the characters correctly in the photo.
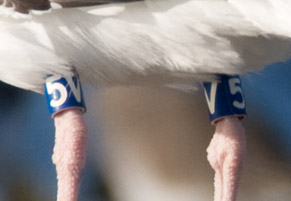
In this photo, the band on the right leg looks like “V5″, but if you look closely you will see the band seam which indicates a separation between the codes. In all cases the spacing of the characters indicates the correct order to read them. You can see this in the photo of dark blue 5V as well as on red E8 and dark green JP in photos above.
Here are two more examples. Even if there were no underlines to indicate that the Y in “YX” and the T in “TE” are the first characters, you can see that the spacing between the letters is different.
Although there are exceptions to the rule, most oystercatchers will have the same plastic field readable bands on both upper legs. This improves the chances of the codes being read completely and correctly. You can use this to your advantage when viewing an oystercatcher. If you can view the bird from multiple angles, you will see more of the characters on both bands. Be careful about making assumptions, and only report what you can see. For example, when looking at orange KC in the photo, if you just looked at the band on bird’s upper right leg, you wouldn’t know if the underlined character is a K or an X. But, on the other band, it’s clearly a K.
All of these details are sometimes difficult to discern in the field, but it is usually possible to do so with careful observation. Photos of banded oystercatchers can be very useful in determining the band color, code, and location of the band on the leg. You can upload photos of your bird when you report a band and get help interpreting them. Also, as you fill out the band reporting form, the ![]() will provide you with additional explanations and photographic examples. Be sure to click on them if you are unsure of what is wanted or if you are new to using the form.
will provide you with additional explanations and photographic examples. Be sure to click on them if you are unsure of what is wanted or if you are new to using the form.
Finally you may notice a metal band, such as on the lower right leg of orange KC and the lower left leg of dark green JP above. The metal bands do have a unique eight- or nine-digit code on them as well, but these are not typically readable in the field. Because of the plastic field readable bands, the metal band’s code is not needed-though it’s a good idea to record the location of the metal band whenever possible.

